(The following are notes to support the live webinar)
- Learn Four Types of Video for Online Classes, and their different purposes
- Receive guidance and tips for creating each type of video
- Build a foundation for brainstorming & scripting your own videos for your classes
“More than content, more than course design, YOU are the factor in an online course that has the greatest potential to help your students succeed.”
– Karen Costa
Why make videos for class:
- Humanize your class by putting more of “You” into it.
- Build relationships. The more you know your students, the easier it is.
- Validate and Motivate your students.
- Save time for you and your students by summarizing big ideas and clarifying goals.
- Implicit Messaging: Share the lessons that are better shown rather than said.
Type 1: The Super Simple Video
When to use a Super Simple Video
- Anything in which emotion and connection might matter
- Direct Student Feedback
- Affirming or Celebrating Student Comments
- Weekly synthesis of student discussions and ideas
- Quick demonstrations of how the material matters in your everyday life.
Note: Informational videos should always also include a text transcription for those who do not want to watch the video. (Assignment tutorials, syllabus overviews, etc.)
The Hard Part: Actually talking on Camera
- Talk back to fear
- Connect, don’t “perform”
- Elevate your Energy just a bit
- Relax
- Start Simple
Tech Tips
- Your phone or webcam are good enough.
- Use a large powerful light source
- Hold the camera steady (duct tape, tripod, or clamp)
- Make sure you are in a clean audio environment (turn off A/C)
Cheapest & Best Tech Upgrades
- Lapel Mic ($20)
- Or Desktop Mic ($50-$150) (Blue Yeti is $100)
- Teleprompter (Parrot Padcaster $100)
- Large Soft Lights ($60 flourescents – $200 LEDs)
Type 2: The Hype Video
The Hype video is as short video (15 seconds to 5 minutes) introducing big ideas and importance of those ideas, often set to music. The goal is to get students engaged and intigued. Hype videos work well as Course Trailers or at the top of a weekly module to introduce the big themes and why they matter. Here are 3 examples of Course Trailers:
You can also use a “Hype” video to kick off a week of lessons. Here are some examples:
You can make these very short (even 15 seconds can be great!) or extend them into a longer video that overviews some of the main points for the week, like this:
TIPS:
- Identify the main big ideas you want to highlight.
- Brainstorm why they are important and how to convey that importance.
- Choose great podcasts, audiobooks, and videos that can help you convey the message.
- Download with 4K Video Downloader (or other downloader)
- Import into editor (Da Vinci Resolve is free and pro-level)
- Find Stock Video and import into editor.
- Find a good music track (preferably with no vocals) and import into editor
- Create the sound layer first. This is the most important.
- Add your clips, and edit to the rhythm.
- Export and Upload.
Best source for free copyright-free music: YouTube Audio Library
Tip: Browse the library from inside YouTube Studio and you can filter by mood and genre.
Best sources for free stock video:
- Built in to Microsoft PowerPoint (under Insert => Pictures => Stock Images)
- Videvo.net
- Pexels.com
- Pixabay.com
- Archive.org
- Also consider using gifs from GIPHY
AI Text-to-Image & Text-to-Video Tools
- Canva.com (About 15-20 free image creations per day)
- Blue Willow
- This is changing fast. Full List at Futuretools.io
Can you use copyrighted material?
Laws differ by country. In the United States, Fair Use is determined by looking at 4 characteristics of your use:
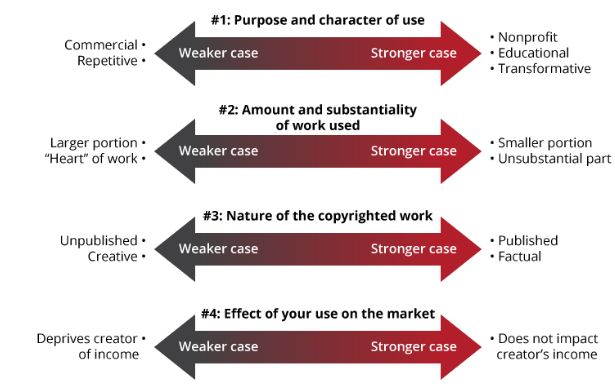
In short, using small portions of factual material for non-profit educational purposes that does not impact the creator’s income is okay.
Brainstorming a Hype Video “Trailer”
Let’s follow Jessica Abel’s XY Formula:
X = What you are talking about
Y = Why it matters
1. List all of the key topics in your class. (X)
2. For each item in the list, identify the “real” goals for your students for each topic. Why do you teach these topics? (Y)
As teachers, we often only focus on X and make sure we pack all the “Xs” into every class session that we can. However, none of those Xs make their way to our students if they are not accompanied by a Y. The Hype video focuses our attention on the Y, and puts the Y right up front so our students are primed, ready, and excited to learn all the Xs.
The 10 Lessons & 10 Challenges of my Intro course (here on anth101.com) came from this process. When I finished, I read the list of “Ys” I had created and it sounded like a manifesto for the class, so I made it the center of the syllabus and read it to the class on the first day:
5 Tips to Make your Hype Videos “Dance”
- Rhythm. Notice how each transition hits a specific beat in the music. It doesn’t always have to be the downbeat. As you can see in some of the sequences, I often use other beats, especially when I need to move quickly through several shots.
- Raise and Lower the Energy to Match the Mood and Music. Each clip matches the energy and mood of the music itself. Slow moments of the song match up with slow landscape shots while fast high-energy moments match up with fireworks and energetic dancing.
Brandon Li’s 10 point Energy Scale:
- E1: Static shots and landscapes
- E2: Slow-motion with little motion …
- E3; Slow motion of people doing stuff
- E4: Regular Speed
- E5: Laughing, smiling jogging
- E6: Pep, Music, Applause, Cooking
- E7: Dancing, Jumping, Cheering
- E8 Running, Sparring, Leaping
- E9: Screaming, Flames, Speed, Fireworks
- E10: massive explosion, big punch, etc.
- Tell Micro-Stories. These are super important in Digital Ethnography. There are several 15 second “micro-stories” in here. For example, the story of evolution is told in a series from Chimp on a Violin => human-looking macaque => DNA => Chimp on a bike => Boy on a bike => Man on a bike flying => Space Shuttle Flying => On the Moon. And then BOOM, a diver dives into the water (as if diving from the moon right into the depths and we see another sequence of food production, from hand-fishing, to subsistence agriculture, to industrial agriculture … followed by a story of a chick, from egg to fried at a fast food restaurant.
- Make Visual Arguments. For example, after the chicken sequence there is a representation of progress and movement (train, cars, hyperspace) but as we see the rich white guy get out of his fancy car we transition to other scenes of poverty around the world and then boom – quick flash of a carefree wealthy girl in a field and right back to girls living in poverty around the world.
- Visual Associations. Every clip transitions to the next through association. At 2:15 we see a homeless guy sleeping on the street => Sign that says “Please Help God Bless You” => Sequence of people looking up toward the heavens => Follow eye-line to trees => Quick flash of pollution generation => Back to forests burning => Ice melting => Global Warming / Storms => Humans struggling => Humans fighting back / protesting ….
Just as in dancing, you have to be aware of where your body ended up from the last move and try to bring it back to where you want it for the next. You can do this by finding subtle associations like this. Let each clip connect to and speak with (for or against) the clips that come before and after it.
Type 3: The Explainer Video
Examples:
Remember X = The Topic … Y = Why it matters. Why it is interesting.
Before we start:
If you have ever given a lecture, you have done this already.
We are just going to try to leverage the video environment to make our lecture better on video.
Tips:
- Learn from the best. Watch Edu-Tubers and borrow their techniques.
- Go beyond PowerPoint. Consider using POV or other techniques.
- If you use PowerPoint, avoid walls of text.
- Use it as animation software
- For the voice-over, consider scripting it
- But write your script in a natural speaking style
- Consider using a teleprompter (but this is not required or necessarily recommended)
Your favorite lecture: _______________________________________
Step 1: What is your X? (Topic): __________________________
Step 2: What is the Y? (Why is it interesting?) ___________________________
3 Ways to Get the “Y” into your Video
(Any 1 of these is enough. You do not need all 3. (and there are other options.))
- The Surprising Fact (Plot: “You would think … but really …”)
- Elevate a Great Example. (Show, then tell. Engage, then reveal.)
- Basic Story (First, then, but, so, change)
Super Simple Story MadLibs Using the Gloria Gaynor Hero Cycle:
At first I was __________, I was _________________________________
I kept thinking I could never ____________________________________
And then I ___________________________________________________
And I grew ______________, I learned ____________________________
Find your “hook,” your “Y” … how can you present X in an engaging way on video?
Tech Tip: The MORPH transition
The morph transition is easy to do, and allows you to do some fantastic animations. It transforms Powerpoint into Animation software.
Here is an advanced example of how this can be used to create a full animation:
Type 4: The Adventure Video
NOTE: This is VERY HARD WORK: I recommend just making one for the whole semester as a start.
3 Reasons you will not want to do it, and why you should do it anyway.
- No Adventures Near You.
- Try something new.
- Talk to someone different from you.
- Go to the studio, lab, or anywher you can model your discipline or practice.
- Job shadow.
- Case study.
- No time.
- Try to do just one for the semester.
- My first one helped students see that we can have open conversations across religious differences. Easy and Quick to produce.
- No skill.
- We are all just practicing and getting a little better every day.
To START: Zoom in on your favorite XY combination of the semester …
something important or interesting.
What is your favorite XY combination in your class?
What are the most important implicit teachings of your class?
What kind of video might express these teachings without “saying” them?
Tips:
- Set the scene right from the beginning.
- Look for opportunities on your calendar for possible adventure videos.
- Sketch yout your story before you start
- You know you will have a beginning, middle, and end.
- Try to brainstorm a challenge or natural story line with a start and finish.
- You can also add a B-Story to bring in the Science and Key Concepts.
- Embrace the visual medium. Show, don’t tell.
- Be present and model your practice.
- Make sure your technology is not too complicated for you.
- Let the technology get out of the way.
- GoPro’s with wide angle and stabilization are great for this (or 360 cameras)(However, they do not work in low light)
Final Thought
Remember, you don’t have to be a tech-wizard and make amazing polished videos. It is more important that you connect and relate to your students.