
The Story Circle of Anthropology
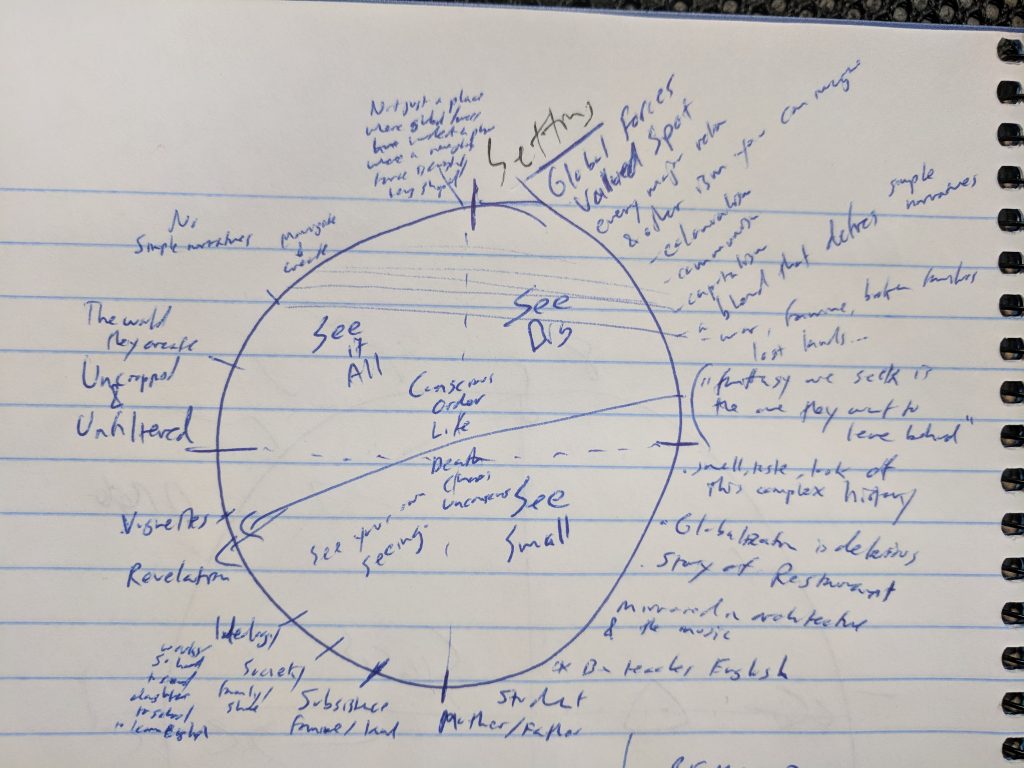
First Quadrant: Seeing Big. Setting and Tension. Describe the ordinary world as most people see it, but add a hint of disruption and dramatic tension – that maybe the world is actually different in some way.
Second Quadrant: Seeing Small. Dive into the chaos of everyday life. Dive into the unconscious worlds of the subjects … reveal the story behind the scenes that is unknown to the public or not talked about.
Third Quadrant: See your own Seeing. Begin the revelation that original perspective was not quite right. These deep, intimate, personal stories of people navigating this larger picture reveals that the world is not as it seems.
Fourth Quadrant: See it all. Return to the world described in the intro but with new knowledge and understanding of how that world is collectively created by the people of that world.
Example from my story about Vietnam:
- (Seeing Big: The taken-for-granted Big Story of the place): Sitting at the crossroads where two great oceans meet the Eurasian landmass, Vietnam has always been a study in globalization. Every major religion: Hinduism, Buddhism, Confucianism, Taoism, Islam, Christianity … along with just about every other ism you can imagine: colonialism, communism, socialism, capitalism …has found a home here … coming together into something that is uniquely Vietnamese and defies all simple narratives. While Vietnam may be difficult to put into words, you can taste it in foods that bring together the best of European and Asian cuisines. You can see it in architecture that draws inspiration from nearly all of human history and every geographic region on the planet. And you can hear it in the music.
- (Seeing small: diving into local lives) But if you really want to know Vietnam, you have to open up to the stories of the people themselves. This food … cooked by a woman who has known the terror of war and famine – who in 1989 brought her kitchen out on the street along with thousands of others in defiance of communist rules, hoping to make a living. The rice, ported in from the the countryside by this man on a Honda Dream, earning just enough to send his daughter to school, where she learns English from an American anthropology student.
- (See your own seeing) There stories reveal that there is nothing short of a revolution occurring right now in Vietnam … what Bill Hayton called “one of the most breathtaking periods of social change anywhere, ever.” Tourists flock to Vietnam to see “the hidden charm” … but as Hayton says, “the image we seek is a close-cropped study in otherness. Zoom out from the girl in the conical hat and the newly erected pylon intrudes on the view …(sequence of shots from earlier going wider to reveal modern Vietnam) (climax point): “The fantasy country we seek is the one they want to leave behind.”
- (See it all) (transition back to portraits of individual lives) Globalization is not something that just happens to them. They, like you and me, are active participants in a complex global dance … bending the rules, blending their cultures, hoping, and working, for a better tomorrow.
The importance of research
In order to tell a good story, you need lots of raw material. In my experience, the ratio of “stuff I know” to “stuff that ends up in a story I tell” is something like 100 to 1. You have to read and read and read … and watch the work of others … take copious notes … study, think, write … and then start over again … over and over again until it all starts to come together. My Vietnam story is only just beginning, and even the final project of this semester will not be the “final word” on Vietnam – not even close.
Up Next: Creating a trailer using your very short story.
Where to get video footage:
- Storyblocks has video, photo, and audio
- Search YouTube, adding “,creativecommons” to find material you can use if you are not monetizing your video
- Use archive.org to find good historical footage
- Great photos at Pixabay
Where to find music
- Go to Create/Music Policies in your YouTube Creator Studio
- Search for the song you want to use and check the permissions (0:55)
- If you found a song, use a YouTube converter to download
- Find unknown artists and ask them if you can use their music
- Support a rising artist on Patreon in exchange for their music (I support Panthurr and Andrew Applepie)
- Check out the YouTube Audio Library (though these are over-used)
- There is some music on Storyblocks
- Also consider purchasing a subscription to artlist.io or something like that.
I also have a playlist of “good free music” on YouTube you can browse.
Editing and Storytelling
0:26 – Every artist should attempt to transgress their own medium
0:57 – Editing is why people love cinema
1:31 – The best editing is often that one buries details of the movie in our subconscious, only to be realized later.
2:45 – Editing didn’t always exist
3:30 – The cut inspired experimentation and discovery in the world of visual storytelling
5:00 – From continuity editing to montage
6:00 – Time/Space gave way to juxtaposition of ideas
6:40 – Within 30 years all modern techniques were established
7:00 – Walter Murch (Apocalypse Now)
7:45 – Rhythm and how long a shot needs to be
9:15 – Cut to reaction shot
10:13 – Cut-away to get into the mind of the subject
11:00 – Which subject you feature and the story it tells
11:15 – There should be motivation behind every cut
12:00 – Pay attention to where you are in the story arc
13:00 – Must have an arc and flow
13:35 – Edits are connectives (however, but, although, therefore, because of this)
14:00 – Examples of how to connect 2 ideas
16:10 – Smash Cuts
17:20 – L and J Cuts
18:12 – Match Cuts
19:20 – Dissolve Cuts
20:10 – The Fade
Walter Murch’s Six Criteria for a Cut
(From his book “In the Blink of an Eye”)
- Emotion (51%)
- Story (23%)
- Rhythm (10%)
- Eye-Trace (7%)
- Two-dimensional plane of screen (5%)
- Three-dimensional space of action (4%)
Creating a workflow for your project:
Tips:
- Don’t save stuff on your desktop!
- Create a folder for your project on an external drive
- Create a video folder in that folder. Create folders for each camera and each day.
- Create an audio folder.
- Create a graphics folder.
- Move your files from your card into the proper folder you just created.
- Back stuff up!
- Create your project in Premiere inside the project folder you created.
- Go to media browser in Premiere and import the folders.
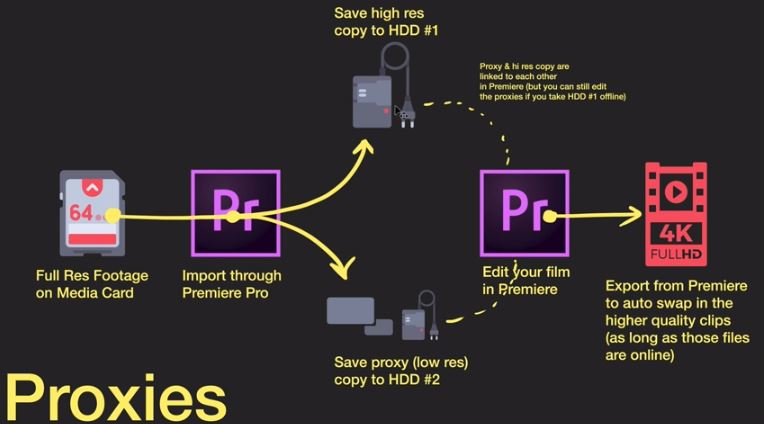
The Power of Ingesting & Proxy-Editing:
This technique will allow you to work without any lags, even on a slower computer. It works by taking your large high-quality files and compressing them into small files. You work with the small files but then do the final export by using the original high-quality files.
- Create a “Proxies” folder in your project folder.
- Add the “toggle proxies” shortcut to your Viewing window (6:45)
- Create a special very low-bit rate preset (h.264, 360p, 1 mpbs). (12:00)
- Add timecode and clip info to proxy preset (13:30)
- Create Ingest preset. (15:45)
- Export preset to your desktop so you can find it. (17:13)
- Go to Media Browser and find your footage.
- Click Ingest and the little wrench (settings)
- Add Ingest Preset. (17:30)
- Select Copy and Create Proxies. Use the ingest preset you created in step 5. Set Copy destination to the proper folder and the Proxy destination to your proxy folder. (10 min)
Fast Editing: 3 Point Editing
3 Points = In, Out, Playhead
- Set your playhead where you want the clip to go.
- View your clip in your source editor.
- Hit “I” to set your In-point and “O” to set your O-point.
- Hit “.” to drop it at the playhead.
- Hit “,” if you want to insert it between clips at the playhead.
- Use Q and W to trim super-fast.
- More complex options start at 5:30
Master Clip Effect
- Editing the master clip vs. the clip you made on your timeline.
- Great way to edit multiple “clips” at once
- A small read line will appear under “fx” to note you have an effect on the master clip.
- Adjustment Layers with Master Effects (6 min)
Adjustment Layers & Transparent Video Layers
Using Presets
- How to save presets (0:57)
- Importing and Exporting presets (3:30)
- Jarle’s Presets (4:00)
Thursday: A buffet of effects
Next Challenge
The Found Footage Trailer. Record your very short story and use properly cleared clips from Videoblocks, YouTube (“,creativecommons”), archive.org and other appropriate legal sources to create a trailer.
Your trailer should include the following:
- legal music
- titles
- at least one overlay of a still image/graphic (may be part of the title)
- variable clip speeds (slow or fast motion)
- a crop and pan
- at least one very special effect transition of your choice
- we will brainstorm more on Thursday


